


Hello, dear readers! In this article, we will dive into creating a RESTful API using Python and Django/Django REST Framework. We aim to cover all aspects discussed in our previous article about REST.
Index
- Introduction
- Requirements
- Setting Up Your Environment
- Understanding Django and Key Dependencies
- Building the RESTful API
- Defining the Task Model
- Documentation and Testing Endpoints
- Conclusion
- GitHub Repository
- References
Introduction
What is a RESTful API?
As defined in our previous article, REST is an architectural style for designing networked applications that defines rules to achieve performance, scalability, simplicity, modifiability, visibility, portability, and reliability. A RESTful API adheres to these principles and constraints by being stateless, cacheable, and effectively supporting the client-server model. It utilizes resource-based URLs and standard HTTP methods (GET, POST, PUT, DELETE) for predictable interactions.
What are we going to develop?
We are going to develop a simple task management API to create tasks with a title and description and control the task status, which can be pending, in progress, or done. To close, we will create documentation using Swagger. It’s a simple API, but you will learn a lot about RESTful APIs in practice with Django/Django REST Framework.
Requirements
Before we begin, make sure you have the following tools installed:
- Python 3.x
- Text Editor or IDE (e.g., VS Code, PyCharm, Notepad++)
In this tutorial, I will use the Ubuntu distribution of Linux, but feel free to use your preferred OS, like macOS or Windows.
Setting Up Your Environment
We will create a virtual environment (venv) to manage dependencies and isolate our project environment. There are several libraries available for creating virtual environments. For simplicity and ease of configuration, we will use venv. However, feel free to choose another method if you prefer. You can explore alternatives by checking this post: Virtual Environments in Python.
Create and Activate the Virtual Environment
mkdir task-management
cd task-management
python3 -m venv venv
source venv/bin/activate
Understanding Django and Key Dependencies
Django
Is a high-level Python web framework that encourages rapid development and clean, pragmatic design as well is Django is a free and open-source.
Django REST framework
Is a powerful and flexible toolkit for building Web APIs. Django require the DRF for build REST API.
Django and Django REST framework
Django provides a comprehensive framework for developing frontend and backend components of web applications. To facilitate the creation of RESTful APIs, Django REST Framework (DRF) is often employed. DRF makes it easier to design and implement CRUD operations, allowing your Django server to function as a robust REST API.
Django CORS Headers
Is the package used to manage Cross-Origin Resource Sharing (CORS) in Django applications. This package adds a response headers middleware to ensure that CORS is supported transparently. Follow the command below to install it.
DRF Spectacular
Is an OpenAPI 3 schema generation library with explicit focus on extensibility, customizability and client generation. It is the recommended way for generating and presenting OpenAPI schemas.
Install Django and Dependencies
pip3 install django
pip3 install djangorestframework
pip3 install django-cors-headers
pip3 install drf-spectacular
Building the RESTful API
Let’s create a src folder where we’ll put our source code. To start the project, we use the command django-admin startproject. In Django, you can create multiple apps within the same project structure, and you can enable all or specific apps as needed. For now, we’ll create the API using the command python3 manage.py startapp api.
mkdir src
cd src
django-admin startproject tasks
cd tasks
python3 manage.py startapp api
After that, we have a structure like this:
task-management/
├── api/
│   ├── __init__.py
│   ├── admin.py
│   ├── apps.py
│   ├── models.py
│   ├── tests.py
│   ├── views.py
├── task/
│   ├── __init__.py
|   ├── asgy.py
│   ├── settings.py
│   ├── urls.py
│   ├── wsgi.py
└── manage.py
We must enable the DRF, API and corsheaders applications, updating he settings.py file.
# tasks/settings.py

INSTALLED_APPS = [
    'django.contrib.admin',
    'django.contrib.auth',
    'django.contrib.contenttypes',
    'django.contrib.sessions',
    'django.contrib.messages',
    'django.contrib.staticfiles',
    'rest_framework', # new app
    'corsheaders', # new app
    'api', # new app
    'drf_spectacular', # new app
]

MIDDLEWARE = [
    'corsheaders.middleware.CorsMiddleware', # new middleware
    'django.middleware.security.SecurityMiddleware',
    'django.contrib.sessions.middleware.SessionMiddleware',
    'django.middleware.common.CommonMiddleware',
    'django.middleware.csrf.CsrfViewMiddleware',
    'django.contrib.auth.middleware.AuthenticationMiddleware',
    'django.contrib.messages.middleware.MessageMiddleware',
    'django.middleware.clickjacking.XFrameOptionsMiddleware',
]

# CORS settings

CORS_ALLOW_HEADERS = (
    "accept",
    "authorization",
    "content-type",
    "user-agent",
    "x-csrftoken",
    "x-requested-with",
)

CORS_ALLOW_METHODS = (
    "DELETE",
    "GET",
    "OPTIONS",
    "PATCH",
    "POST",
    "PUT",
)

CORS_ALLOWED_ORIGINS = []

# drf_spectacular settings

REST_FRAMEWORK = {
    'DEFAULT_SCHEMA_CLASS': 'drf_spectacular.openapi.AutoSchema',
}

SPECTACULAR_SETTINGS = {
    'TITLE': 'Task Management API',
    'DESCRIPTION': 'Simple way to manage tasks',
    'VERSION': '1.0.0',
    'SERVE_INCLUDE_SCHEMA': False,
}
Task Model
The Task model will have the following attributes: title, description, status, created_at, and updated_at. The possible status values for a task are DONE, IN_PROGRESS, and PENDING.
# api/models.py
from django.db import models

STATUS_OPTIONS = [
    ("DONE", "Done"),
    ("IN_PROGRESS", "In Progress"),
    ("PENDING", "Pending")
]


class Task(models.Model):
    title = models.CharField(max_length=255)
    description = models.TextField()
    status = models.CharField(max_length=20, choices=STATUS_OPTIONS, default="PENDING")
    created_at = models.DateTimeField(auto_now_add=True)
    updated_at = models.DateTimeField(auto_now=True)
Task Serializer
The serializer is a Django REST Framework component that allows complex data such as querysets and model instances to be converted to native Python datatypes, which can then be easily rendered into JSON, XML. Serializers also provide deserialization, allowing parsed data to be converted back into complex types after first validating the incoming data.
There are many types of serializers. We will use the ModelSerializer class, that automatically create a serializer class with fields that correspond to the model fields, the Task Model field.
# api/serializers.py
from rest_framework import serializers
from .models import Task


class TaskSerializer(serializers.ModelSerializer):
    class Meta:
        model = Task
        fields = '__all__'
Task View
Django REST Framework provides many types of views, and we will use the ViewSet. The ViewSet is similar to what other frameworks call ‘Resources’ or ‘Controllers’. It is the part of the API that handles incoming requests and returns responses accordingly.
To use the ViewSet, we will define two important elements: the queryset, which will be the Task model, and the serializer_class, which will be the TaskSerializer class that we created previously.
The ViewSet by default provides actions to manipulate the tasks that can be easily associated with the model. This includes creating, updating, retrieving, and deleting tasks, as well as listing all tasks.
# api/views.py
from rest_framework.authtoken.models import Token
from rest_framework.response import Response
from rest_framework import status, viewsets
from .serializers import TaskSerializer
from .models import Task


class TaskViewSet(viewsets.ModelViewSet):
    serializer_class = TaskSerializer
    queryset = Task.objects.all()
Despite the default methods, you’re welcome to tweak them to fit your needs. You can add extra features or change the way information is presented to make the API easier to use and understand.. Here’s how we can customize the following methods: create, update, retrieve, destroy, and list.
Customization TaskViewSet (Optional)
Remember, this customization is optional and you can skip the next tutorial part. However, it’s important to understand how to create different behavior or handle other aspects when creating CRUD operations.
Create Method
The create method handles creating new tasks and provides detailed responses. It uses a try..except block to manage validation errors. If the creation is successful, it returns a success message with the task data. If it fails, it returns an error message with the validation errors.
def create(self, request):
        serializer = self.get_serializer(data=request.data)
        try:
            serializer.is_valid(raise_exception=True)

            serializer.save()
            return Response({
                "code": "API_TASK_CREATE_SUCCESS",
                "message": "Task created successfully",
                "task": serializer.data
            }, status=status.HTTP_201_CREATED)
        except Exception as e:
            return Response({
                "code": "API_TASK_CREATE_ERROR",
                "message": "Failed to create task",
                "errors": serializer.errors
            }, status=status.HTTP_400_BAD_REQUEST)
Update Method
The update method handles updating existing tasks and provides detailed responses. It uses a try..except block to ensure the task exists before attempting to update it. If successful, it returns a success message with the updated task data. Otherwise, it provides an error message.
def update(self, request, pk=None):
    try:
        task = Task.objects.get(id=pk)
        serializer = self.get_serializer(task, data=request.data, partial=True)
        serializer.is_valid(raise_exception=True)

        serializer.save()
        return Response({
            "code": "API_TASK_UPDATE_SUCCESS",
            "message": "Task updated successfully",
            "task": serializer.data
        }, status=status.HTTP_200_OK)
    except Task.DoesNotExist:
        return Response({
            "code": "API_TASK_NOT_FOUND",
            "message": "Task does not exist."
        }, status=status.HTTP_404_NOT_FOUND)
    except Exception as e:
        return Response({
            "code": "API_TASK_UPDATE_ERROR",
            "message": "Failed to update task",
            "errors": serializer.errors
        }, status=status.HTTP_400_BAD_REQUEST)
Retrieve Method
The retrieve method fetches a specific task by its ID and provides detailed responses. It uses a try..except block to handle potential errors, such as the task not existing. A successful retrieval returns the task data; otherwise, an error message is provided.
def retrieve(self, request, pk=None):
    try:
        task = self.get_queryset().get(pk=pk)
        serializer = self.get_serializer(task)

        return Response({
            "code": "API_TASK_RETRIEVE_SUCCESS",
            "message": "Task retrieved successfully",
            "task": serializer.data
        }, status=status.HTTP_200_OK)
    except Task.DoesNotExist:
        return Response({
            "code": "API_TASK_NOT_FOUND",
            "message": "Task not found"
        }, status=status.HTTP_404_NOT_FOUND)
    except Exception as e:
        return Response({
            "code": "API_TASK_RETRIEVE_ERROR",
            "message": "Failed to retrieve task.",
            "error": str(e)
        }, status=status.HTTP_400_BAD_REQUEST)
Destroy Method
The destroy method handles deleting tasks and provides detailed responses. It uses a try..except block to manage errors. If successful, it returns a success message. Otherwise, it provides an error message. This ensures that if the task doesn’t exist or if there’s another error, the user receives a clear and detailed response.
def destroy(self, request, pk=None):
    try:
        task = self.get_queryset().get(pk=pk)
        task.delete()

        return Response({
            "code": "API_TASK_DELETE_SUCCESS",
            "message": "Task deleted successfully"
        }, status=status.HTTP_204_NO_CONTENT)
    except Task.DoesNotExist:
        return Response({
            "code": "API_TASK_NOT_FOUND",
            "message": "Task not found"
        }, status=status.HTTP_404_NOT_FOUND)
    except Exception as e:
        return Response({
            "code": "API_TASK_DELETE_ERROR",
            "message": "Failed to delete task.",
            "error": str(e)
        }, status=status.HTTP_400_BAD_REQUEST)
List Method
The list method handles listing tasks and provides detailed responses. It uses a try..except block to manage errors. If successful, it returns a success message with the list of tasks. Otherwise, it provides an error message. This ensures that if there’s an error during the listing process, the user receives a clear and detailed response.
def list(self, request):
    try:
        tasks = self.get_queryset()
        serializer = self.get_serializer(tasks, many=True)

        return Response({
            "code": "API_TASK_LIST_SUCCESS",
            "message": "Tasks retrieved successfully",
            "tasks": serializer.data
        }, status=status.HTTP_200_OK)
    except Exception as e:
        return Response({
            "code": "API_TASK_LIST_ERROR",
            "message": "Failed to retrieve tasks.",
            "error": str(e)
        }, status=status.HTTP_400_BAD_REQUEST)
Task URLs
To define the URLs, we need to create the urls.py file in the api folder and define the URLs using the DefaultRouter from the routers component. The single line router.register(‘tasks’, TaskViewSet) will create all the routes needed to manipulate the task.
# api/urls.py
from django.urls import path, include
from rest_framework import routers
from .views import TaskViewSet

router = routers.DefaultRouter()
router.register('tasks', TaskViewSet)

urlpatterns = [
    path('', include(router.urls)),
]
After that, we must include these URLs in the main structure by modifying the urls.py file in the task folder.
# task/urls.py
from django.contrib import admin
from django.urls import path, include

urlpatterns = [
    path('api/', include('api.urls')),
    path('admin/', admin.site.urls),
]
Documentation and Testing Endpoints
To view the documentation, we need to add the documentation URLs to your API folder. Make sure you have an internet connection so the documentation styles can load correctly.
# api/urls.py
from django.urls import path, include
from rest_framework import routers
from .views import TaskViewSet
from drf_spectacular.views import SpectacularAPIView, SpectacularSwaggerView

router = routers.DefaultRouter()
router.register('tasks', TaskViewSet)

urlpatterns = [
    path('schema/', SpectacularAPIView.as_view(), name='schema'),
    path('docs/', SpectacularSwaggerView.as_view(url_name='schema'), name='swagger-ui'),
    path('', include(router.urls)),
]
After that, access the terminal to create the migrations and start the servers.

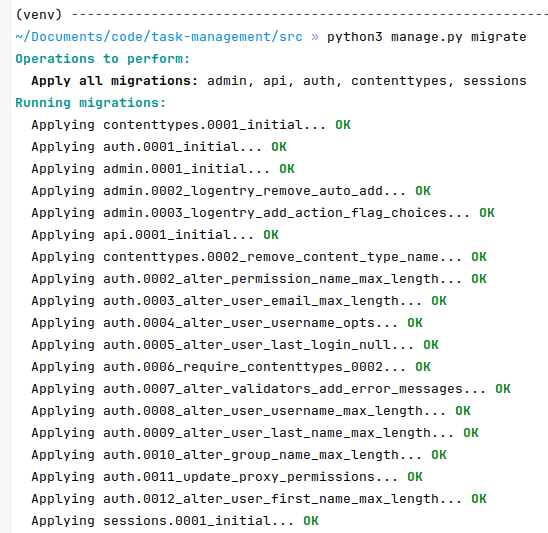

Testing the endpoint
To tests the endpoints, you must access the http://127.0.0.1:8000/api/docs, and will be display a page like this.
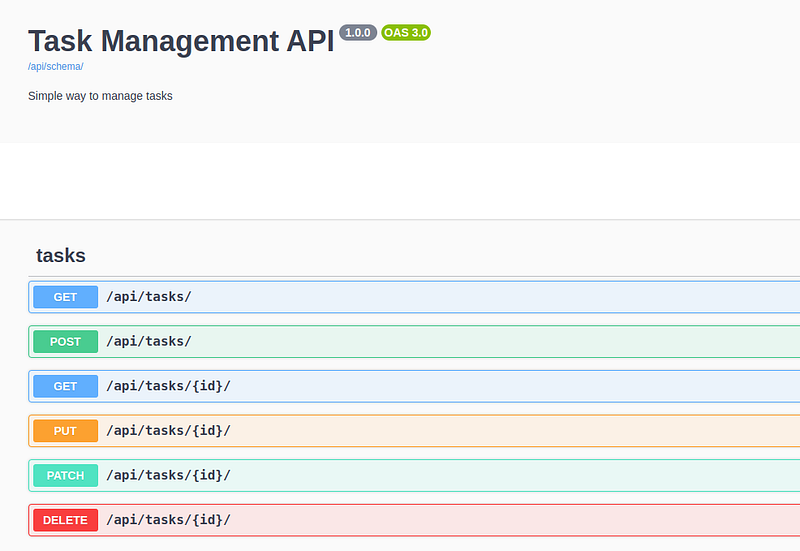
With all methods to manipulate the tasks and tests, follow the image with demonstration.


Conclusion
Creating a RESTful API using Django and Django REST Framework can be straightforward, as shown in this tutorial. We covered the essential steps to build a simple task management API, including setting up the environment, creating models, serializes, views, and routes. By following these steps, you can quickly develop more complex APIs to meet various needs.
Bye!
Your thoughts matter! Share your feedback on this tutorial or ways I can improve in the future.
GitHub Link
https://github.com/mariomthree/task-management-api. Feel free to suggest improvements or leave a star!
References
Django
The web framework for perfectionists with deadlines.www.djangoproject.com
drf-spectacular – drf-spectacular documentation
Documentation is an integral part of API development and OpenAPI 3 is finally here to make that process easier. By…drf-spectacular.readthedocs.io
Documenting your API
Django, API, REST, Documenting your APIwww.django-rest-framework.org
How to enable CORS headers in your Django Project? – GeeksforGeeks
A Computer Science portal for geeks. It contains well written, well thought and well explained computer science and…www.geeksforgeeks.org
Django e Django Rest: Diferenças e aplicações | Alura
Descubra nesse artigo as diferenças e semelhanças entre Django e Django Rest Framework. Crie aplicações web com Django…www.alura.com.br
https://apidog.com/articles/difference-between-django-and-django-rest-framework